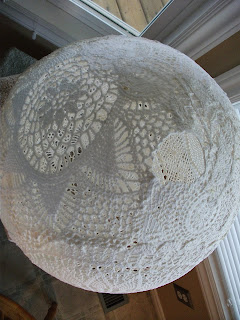
I have recently started to really like doilies. I love how beautiful they are and the many different things you can create with them. I was on a site called pinterest (which is the best site ever), and I saw a picture for a doily ball. Ah, it was gorgeous and I knew that I needed to have one in my room. After a search all over town for wallpaper glue (some of the most obvious stores didn't have it), I finally made this beautiful creation.
Materials:
1 punching balloon (from the dollar store)
paint brush
string
doilys (get a lot, I thought I would have enough to make a big and small one, but I just had enough for my big one!)
wall paper glue
paper to not get the glue everywhere (Bieksa winning goal paper is preferred)
Instructions:
Blow up your balloon (or whatever inflatable object you are using).
Take one of your doilies and on both sides cover it with the wallpaper glue. Don't go skimpy on this step! The more glue, the better. You want to make sure that they dry hard.
After you have done this, take your doily and stick it onto your balloon, making sure that the sides are evenly pressed down. Once I stuck the doily on, I added another layer of glue just in case.
As you can see, I first decided to place my balloon in a plant holder lined with newspaper. However, I soon realized that it may be easier if it was just hanging (which ended up being probably more difficult). Keep on adding the doilies until the balloon is covered. Make sure that the doilies overlap as this is how the ball will form and stick together. It will look something like this:
Now your doily ball will be done!
You can either hang it with string, fishing line, but a light into it, use it as a centrepiece, or do with it how you please. I love this craft as it's pretty easy, not too expensive and just plain gorgeous. I plan on doing a couple smaller ones and hanging them all in a corner of my room. Enjoy!


Beth! it turned out so good!
ReplyDeleteWow! I love it!
ReplyDeleteI like the Canucks plug!
ReplyDeleteThank you for this post. I came across a doily lamp a few weeks back & now I know how to make it. This will be a great project for my patio tomorrow.
ReplyDeleteHi I just tried making these last night and we used "Roman's universal border paste"...the doileys are not getting hard. Can you please tell me exactly what kind of glue/paste you used?
ReplyDeleteHI I tried making this two days ago and my dollies are not drying and they are falling off my balloon. Can you give me some advice I really want it to work.. Would you start over.. Wash them??
ReplyDeleteThanks